Chapter 8: Reporting Errors and Other Messages
Now that we have an icon on the iconbar and are responding when the user clicks on it, it’s time to start looking at communicating back. In a normal application, interaction with the user would be through windows and menus. We’ve not encountered those yet, but what we can do is give some feedback using the somewhat simpler report provided by the Wimp’s error system.
Giving feedback
Alongside windows and menus, the Wimp provides reports which enable applications to inform the user about things that have gone wrong. They have grown in capability over the years, and now provide the facility to report information and ask questions without having to go through the relatively cumbersome process of opening a window on the screen. Their simplicity comes from the fact that they don’t multitask at all – this can make them significantly easier to handle when things are going wrong, but it’s also a feature that is frequently held against them.
The appearance of the report boxes has evolved over the years; an example from Draw running on a recent version of the OS can be seen in Figure 8.1.

Figure 8.1: A simple example of a Wimp Report box
Error reports are made using Wimp_ReportError, which maps to two functions in OSLib: wimp_report_error() and wimp_report_error_by_category(). Aside from anything else, this provides a neat example of how OSLib handles SWIs which present two or more significantly different options in the sets of parameters that they require. In this case, the reason is that error reporting changed significantly when RISC OS 3.5 was released with the RiscPC. Although modern applications should probably be using the new interface, the old one is still more or less supported and – as it requires less setting up, we’ll start there before upgrading to the new system.
Creating an ‘old’ report is done using the wimp_report_error() function, and requires just three pieces of information. The function’s prototype is defined as follows:
extern wimp_error_box_selection wimp_report_error(
        os_error const          *error,
        wimp_error_box_flags    flags,
        char const              *name
);
The first item is *error, which is a pointer to a standard OS error block. These blocks are used throughout RISC OS, and not just by the Wimp: they’re returned by the ‘X’ form of SWIs when things go wrong, and the idea is that in an application, they can be passed straight on to Wimp_ReportError if required. As we can tell from the fact that os_error begins with “os_” and not “wimp_”, OSLib defines the structure in oslib/os.h and not oslib/wimp.h. The definition is as follows:
struct os_error {
        bits    errnum;
        char    errmess[252];
};

typedef struct os_error os_error;
The 256 byte block contains an error number in os_error.errnum, followed by an arbitrary message in os_error.errmess. The number is a RISC OS error number and will often define precisely what the problem was. In the case that we wish to use Wimp_ReportError to present a message to the user, then the actual error number is somewhat arbitrary. Setting it to 255 – which is unused by the OS – seems to be a common compromise. We could, therefore, set up an error block to pass a message to the user using code similar to the following:
os_error error;

error.errnum = 255;
strncpy(error.errmess, "Hello World!", os_ERROR_LIMIT);
error.errmess[os_ERROR_LIMIT - 1] = '\0';
It’s generally good practice to use strncpy() instead of the older strcpy() function to copy strings into buffers, in order to ensure that we don’t over-run the allocated space. The function is available in the 32-bit Shared C Library, so there’s no reason for avoiding it. It’s also important to terminate the copied string at the end of the buffer, since strncpy() won’t do this for us if it did run out of space. OSLib defines os_ERROR_LIMIT for us to be 252, to reflect the size of the buffer defined by RISC OS.
The flags passed in parameter 2 control the appearance of the box, and for now we’ll set them to wimp_ERROR_BOX_OK_ICON to request that an OK button is provided. The final parameter, *name, should point to a string containing the name of our application – in c.main we tell Wimp_Initialise that the application is called ‘Example App’, so we’ll stick with that here.
A generic function
Since this is all a little cumbersome when we simply wish to present a message to the user, it would make sense to package Wimp_ReportError up into a separate chunk of code. To that end, we’ll create a new file called c.repbox, as shown in Listing 8.1 which defines a repbox_message(char *message).
/**
 * Example 8.1
 *
 * (c) Stephen Fryatt, 2017
 *
 * File: repbox.c
 */

#include "oslib/os.h"
#include "oslib/wimp.h"

#include <string.h>

#include "repbox.h"

/* Report a message */

void repbox_message(char *message)
{
        os_error error;

        error.errnum = 255;
        strncpy(error.errmess, message, os_ERROR_LIMIT);
        error.errmess[os_ERROR_LIMIT - 1] = '\0';

        wimp_report_error(&error, wimp_ERROR_BOX_OK_ICON, "Example App");
}
Listing 8.1 (c.repbox): The new report file
This is more or less the code that we outlined above, except that the message being copied into the error block is the one pointed to by the *message parameter. Note that we’re including both oslib/wimp.h and oslib/os.h in order to be able to use os_error.
The file also includes the h.repbox file, which is as shown in Listing 8.2. It merely provides a function prototype for repbox_message(), so that we can access it from elsewhere in the application.
/**
 * Example 8.1
 *
 * (c) Stephen Fryatt, 2017
 *
 * File: repbox.h
 */

#ifndef EXAMPLEAPP_REPBOX
#define EXAMPLEAPP_REPBOX

/* Report a message */

void repbox_message(char *message);

#endif
Listing 8.2 (h.repbox): The header for the new report file
Armed with this new code, we can now #include "repbox.h" in c.ibar before using the new reporting function to respond to the user clicking on the iconbar icon. If we wished to greet the user when they click Select on the icon, we could amend the switch statement as follows:
static void ibar_mouse_click(wimp_pointer *pointer)
{
        switch (pointer->buttons) {
        case wimp_CLICK_SELECT:
                repbox_message("Hello World!");
                break;
        case wimp_CLICK_ADJUST:
                main_quit_flag = TRUE;
                break;
        }
}
If we now amend the Makefile so that the OBJS line reads
OBJS = main ibar repbox
we can double-click on Mk to build a new version of our application. After running it, click Select on its iconbar icon and the report shown in Figure 8.2 should appear. The full code can be found in Download 8.1.

Figure 8.2: Our first feedback from the application
Different options
The flags passed to wimp_report_error() allow us to tailor the report to a certain extent. OSLib defines a number of constants for wimp_error_box_flags, of which the following are applicable to the ‘old’ reports.
#define wimp_ERROR_BOX_OK_ICON                  ((wimp_error_box_flags) 0x1u)
#define wimp_ERROR_BOX_CANCEL_ICON              ((wimp_error_box_flags) 0x2u)
#define wimp_ERROR_BOX_HIGHLIGHT_CANCEL         ((wimp_error_box_flags) 0x4u)
#define wimp_ERROR_BOX_NO_PROMPT                ((wimp_error_box_flags) 0x8u)
#define wimp_ERROR_BOX_SHORT_TITLE              ((wimp_error_box_flags) 0x10u)
#define wimp_ERROR_BOX_LEAVE_OPEN               ((wimp_error_box_flags) 0x20u)
#define wimp_ERROR_BOX_CLOSE                    ((wimp_error_box_flags) 0x40u)
#define wimp_ERROR_BOX_NO_BEEP                  ((wimp_error_box_flags) 0x80u)
The report currently produced by the application and shown in Figure 8.2 had the wimp_ERROR_BOX_OK_ICON flag set, which resulted in an OK button – in fact, this is the default state, which the Wimp will fall back to if no flags are set at all. We could, however, have specified wimp_ERROR_BOX_CANCEL_ICON instead:
wimp_report_error(&error, wimp_ERROR_BOX_CANCEL_ICON, "Example App");
As might be expected, the report now has a Cancel button instead of OK – as shown in Figure 8.3.

Figure 8.3: Using the wimp_ERROR_BOX_CANCEL_ICON flag
Similarly, we could request the inclusion of both buttons by setting both flags: this is done by bitwise-oring them together using the | operator:
wimp_report_error(&error,
                wimp_ERROR_BOX_OK_ICON | wimp_ERROR_BOX_CANCEL_ICON, "Example App");
The result can be seen in Figure 8.4.
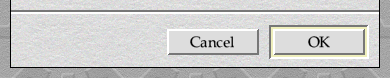
Figure 8.4: Using the OK and Cancel flags together
In each case, the highlighted button is the default, and will be selected if Return is pressed. In the last example the OK button was highlighted, but we might prefer Cancel to be highlighted instead – perhaps if we were asking whether the user really wished to delete their unsaved document. To achieve this, we simply include wimp_ERROR_BOX_HIGHLIGHT_CANCEL in the flags:
wimp_report_error(&error,
                wimp_ERROR_BOX_OK_ICON | wimp_ERROR_BOX_CANCEL_ICON | wimp_ERROR_BOX_HIGHLIGHT_CANCEL,
                "Example App");
The effect is to swap the two buttons over, such that Cancel is now the default. This can be seen in Figure 8.5.

Figure 8.5: Making Cancel the default action
The title of the report in Figure 8.2 above was “Message from Example App”: this came from the Wimp prefixing the application name pointed to by *name with “Message from ”. In older versions of RISC OS, this could be the slightly more worrying “Error from ” instead. It’s possible to ask the Wimp not to do this by including wimp_ERROR_BOX_SHORT_TITLE in flags – meaning that the title will be the exact string pointed to by *name;. Either way, the supplied text must be less than 20 characters long.
The other flags are all fairly esoteric, and are of little use to a multi-tasking Wimp application. It’s worth highlighting wimp_ERROR_BOX_NO_BEEP, however: it does exactly what its name suggests, and prevents the ‘beep’ when the report opens. Setting this flag prevents the user from making their own choice on a system-wide basis, and is the first of many examples where the Wimp offers us options that we shouldn’t take up if we wish to be ‘sociable’.
Upgrading our report
As noted above, wimp_report_error() accesses a usage of Wimp_ReportError which was deprecated in 1994 – although there are still a number of applications using it, including the example from Draw seen in Figure 8.1! The new interface offers a number of useful improvements, however – it would be daft not to make use of them.
The newer wimp_report_error_by_category() function is defined by OSLib as:
extern wimp_error_box_selection wimp_report_error_by_category(
        os_error const          *error,
        wimp_error_box_flags    flags,
        char const              *name,
        char const              *sprite_name,
        osspriteop_area const   *area,
        char const              *buttons
);
The first three parameters are exactly the same as for wimp_report_error(), except that flags now has a few more options to set:
#define wimp_ERROR_BOX_GIVEN_CATEGORY           ((wimp_error_box_flags) 0x100u)
#define wimp_ERROR_BOX_CATEGORY                 ((wimp_error_box_flags) 0xE00u)
It’s necessary to set wimp_ERROR_BOX_GIVEN_CATEGORY in order to use the new API, so this flag is actually mandatory when calling wimp_report_error_by_category(). This then enables the bit-field over the range covered by wimp_ERROR_BOX_CATEGORY, which allows us to set a ‘category’ for the report.
These bit-fields are a common feature of flag words used by Wimp SWIs, and are something that we’ll encounter again and again. By defining wimp_ERROR_BOX_CATEGORY to be ((wimp_error_box_flags) 0xE00u), OSLib is saying that the error box category fills the range of bits which make up 0xE00u – that’s bits 9, 10 and 11 of the word. The Wimp treats these bits as a 3-bit number in the range from 0 to 7, instead of viewing them as three separate flags.
OSlib goes on to define a few more useful constants, the first of which are the values that the Wimp will accept in this field:
#define wimp_ERROR_BOX_CATEGORY_INFO            ((wimp_error_box_flags) 0x1u)
#define wimp_ERROR_BOX_CATEGORY_ERROR           ((wimp_error_box_flags) 0x2u)
#define wimp_ERROR_BOX_CATEGORY_PROGRAM         ((wimp_error_box_flags) 0x3u)
#define wimp_ERROR_BOX_CATEGORY_QUESTION        ((wimp_error_box_flags) 0x4u)
A value of 0 is the ‘default‘ (or ‘non-classified’, as the Programmer’s Reference Manual refers to it) report, with values 1 to 4 being ‘Information’, ‘Error’, ‘Program Error’ and ‘Question’ respectively. Finally, a shift value is defined, to tell us how far those four constants need to be shifted in order to locate them correctly in the value passed to flags:
#define wimp_ERROR_BOX_CATEGORY_SHIFT (9)
The four categories are more or less what their names suggest. Information reports are intended to be informational: that is, telling the user something that’s normal and not of concern. Similarly, Questions are for asking the user things when the situation is normal. Errors are for when things have gone wrong but the application remains in control – running out of memory or disc space, perhaps; a corrupt file; bad user input. Program Errors are for when things have gone seriously wrong in a way that the application can’t handle: usually the result of bugs or incompatibilities with unexpected hardware or OS versions, and almost always resulting in the application exiting immediately afterwards.
Each type of report has a different symbol displayed to the user at the left-hand side of the box: the ones used on RISC OS 5 can be seen in Figure 8.6 The symbols are in order, with category ‘warning’ (category 0) on the left through to ‘question’ (category 4) on the right.
![]()
Figure 8.6: Wimp report symbols for categories 0 to 4
We can update our repbox_message() in c.report to make use of the new report by changing it as follows:
void repbox_message(char *message)
{
        os_error error;

        error.errnum = 255;
        strncpy(error.errmess, message, os_ERROR_LIMIT);
        error.errmess[os_ERROR_LIMIT - 1] = '\0';

        wimp_report_error_by_category(&error, wimp_ERROR_BOX_GIVEN_CATEGORY  |
                        (wimp_ERROR_BOX_CATEGORY_INFO << wimp_ERROR_BOX_CATEGORY_SHIFT) |
                        wimp_ERROR_BOX_OK_ICON,
                        "Example App", "application", wimpspriteop_AREA, NULL);
}
The *sprite_name parameter should point to the name of a sprite to show in the top-left of the report – this would usually be the application sprite, but as we don’t have one of them yet, we will stick with the application sprite from the Wimp’s collection. To ensure that the sprite is taken from the Wimp Sprite Area, *area is set to wimpspriteop_AREA – this requires us to #include "oslib/wimpspriteop.h". For now, we’ll set *buttons to NULL.
A full set of the changes can be found in Download 8.2. When the application is re-compiled and run, a Select click on its iconbar icon will produce the information report seen in Figure 8.7.
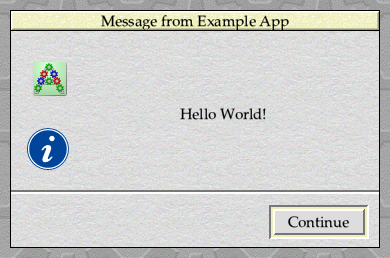
Figure 8.7: Using an Information report to say hello
Aside from the new graphics, the other change that has resulted from setting the wimp_ERROR_BOX_GIVEN_CATEGORY flag is that the OK has changed to read Continue. Presumably Acorn considered this to be more positive than OK when things might have been going wrong!
Clearer options
There’s one more thing that we can change using the new report API: we can add to – or even completely replace – the OK and Cancel buttons in the box. This is done by setting *buttons to point to a string containing a set of one or more button labels in a comma separated list.
To implement this, we’ll update repbox_message() again to allow a set of button labels to be supplied by the caller:
void repbox_message(char *message, char *buttons)
{
        os_error error;

        error.errnum = 255;
        strncpy(error.errmess, message, os_ERROR_LIMIT);
        error.errmess[os_ERROR_LIMIT - 1] = '\0';

        wimp_report_error_by_category(&error, wimp_ERROR_BOX_GIVEN_CATEGORY  |
                        (wimp_ERROR_BOX_CATEGORY_INFO << wimp_ERROR_BOX_CATEGORY_SHIFT) |
                        wimp_ERROR_BOX_OK_ICON,
                        "Example App", "application", wimpspriteop_AREA, buttons);
}
Remember to change the prototype in h.repbox as well as the function itself in c.repbox! We can now change the call made to repbox_message() in c.ibar to include this additional *buttons parameter. It could be set to NULL to retain the existing behaviour, or we could add some new buttons which respond to our application’s greeting:
repbox_message("Hello World!", "Howdy!,Go Away!");
If these changes are compiled and run, clicking Select on our iconbar icon should result in the report shown in Figure 8.8.
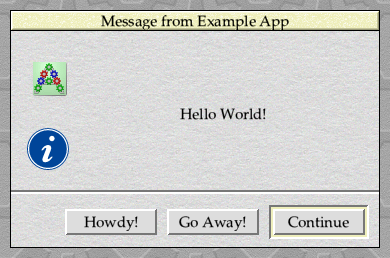
Figure 8.8: It’s possible to add custom buttons to reports
The Continue button is still there on the right, because wimp_ERROR_BOX_OK_ICON is still being set in flags. If we remove it, so that the call to wimp_report_error_by_category() looks like this:
wimp_report_error_by_category(&error, wimp_ERROR_BOX_GIVEN_CATEGORY  |
                (wimp_ERROR_BOX_CATEGORY_INFO << wimp_ERROR_BOX_CATEGORY_SHIFT),
                "Example App", "application", wimpspriteop_AREA, buttons);
then only our ‘custom’ buttons will be shown to the user – as can be seen in Figure 8.9. A complete set of code can be found in Download 8.3 below.

Figure 8.9: We don’t even need to include the default buttons
It should be clear that the report system is fairly flexible, and the fact that the Wimp sorts out all of the formatting for us makes it easy to use. There are some limitations to the additional buttons, though: although the Wimp will extend the report box horizontally to accommodate a large number of buttons, this can quickly fill a small screen and should be used with caution. That said, if you need to ask a question with more than a “Yes, No or Cancel” kind of answer, then a report box probably isn’t going to be the correct way to do it – you should be thinking about a proper dialogue box, once you know how to do that!
Something that we’ve not considered yet is the question of which button was chosen by the user if there was more than one available: if we’re going to the length of asking the user a question, being able to identify how they responded would be useful. We’ll look at that soon, after we’ve added another debug tool to our armoury in the next chapter.