Chapter 5: A Better Way to Compile
The updated application created in the previous chapter can, in theory, be compiled in the same way as outlined in Chapter 3 – except that we’re now using a second library besides OSLib. On disc, the source code is very similar to what we’ve used before, as can be seen in Figure 5.1; a copy can be downloaded from Download 5.1.
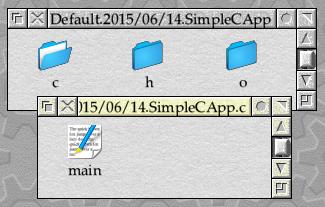
Figure 5.1: The updated application source on disc
However, repeating the process from Section 3.4 with the new source code will result in failure as shown in Figure 5.2. Firstly, the included file sflib/event.h can’t be found; second, and as a direct consequence, several of the newly-introduced items in the example are being reported as “undeclared”.

Figure 5.2: The C Compiler complains about a number of missing items
Introducing SFLib
The solution to this problem is to install the SFLib library, in a similar way as to what we did for OSLib. Copies of the library can be downloaded in a form suitable for use with the DDE from my website – you need the AOF version. The library is licensed with the EUPL, meaning that it’s OK to use it in a range of open-source projects.
With the zip file downloaded, the files shown in Figure 5.3 should be available. Note that the screenshot shows the files at the time of writing; future releases may contain different items.
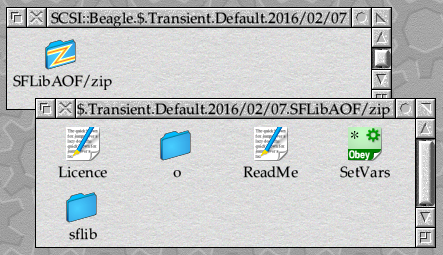
Figure 5.3: The files that comprise the SFLib library
As with OSLib, there is no set way to install the library – we’ll go with a similar approach and create an SFLib folder in the AcornC/C++ folder and copy the archive’s contents into that as shown in Figure 5.4.

Figure 5.4: The SFLIb library files installed for use
Just as was the case with OSLib, the SetVars file included in the SFLib install must be run (or double-clicked) before SFLib is used in a compilation.
Compiling with SFLib and OSLib
Once again, load CC on to the iconbar and drag main from the c folder of our project (in Download 5.1) to its icon to open the CC window with the Source field filled in.
Just as OSLib’s SetVars pointed OSLib$Path and OSLib$Dir to the correct locations, the SetVars supplied with SFLib ensures that SFLib$Path and SFLib$Dir are set correctly. To ensure that both header files referred to by
#include "oslib/wimp.h"
#include "sflib/event.h"
are found, the Include field must have both OSLib: and SFLib: added to it in a comma-separated list, as shown in Figure 5.5.
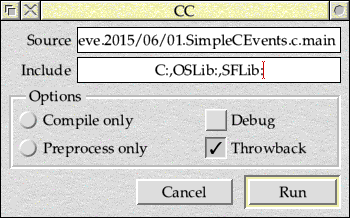
Figure 5.5: Both OSLib and SFLIb need to be added to CC’s include path
CC also needs to know where the SFLib library is, so a path must be added to the Libraries entry of CC’s menu. However, there’s a catch: the linker which comes with the DDE is more fussy than those with many other compilers, so the order of the entries matters. SFLib itself also depends on OSLib, so SFLib must appear before OSLib in the list of libraries: that is, SFLib:o.SFLib must appear before OSLib:o.OSLib32 as shown in Figure 5.6.
![]()
Figure 5.6: SFLib must come before OSLib in the list of libraries
With the library links in place, clicking on Run should compile the code and open a save dialogue box from which an absolute file can be saved. When run, this should perform in the same way as the original BASIC application.
Automating the build
While this largely manual build process works OK for a simple application such as the current examples, it soon becomes impractical – especially if it’s necessary to move between different projects. Having to set CC up differently each time is a nuisance and, even if we stick with just the one project, it will soon become hard to manage as our application grows bigger.
Fortunately this isn’t an unusual problem, and there’s a tool out there to solve it for us. Having originated on Unix, Make is available on many computer platforms these days – including RISC OS. The tool works with Makefiles, which completely define a project and tell the compiler (and any other tools) how to build it. Writing makefiles has sometimes been seen as a difficult subject, but fortunately current versions of the DDE come with some useful extras to help us.
First, let’s clear up some terminology. Whilst the tool that processes makefiles is usually known as Make (including the one that ships with the RISC OS port of GCC), Acorn had to be different. Confusingly the DDE does contain a Make application, but it’s concerned with automatically creating makefiles – and these days its use is deprecated. Instead, Acorn called their version of Make the Acorn Make Utility, or Amu for short. It’s supplied with the other applications that form the DDE, although it’s very rare to actually run it directly.
Instead of using the Make application to assemble a makefile, current versions of the DDE recommend the use of Shared Makefiles. These have evolved from the tools used to build RISC OS itself, and provide an easy way to configure a project without much effort. To make things easier for beginners, a range of ‘skeleton projects’ are provided in $.Sources.DDE-Examples.Skeletons. Since we’re currently creating a simple Absolute file from our project, the one we need is exampleabs as shown in Figure 5.7.

Figure 5.7: A range of skeleton projects are supplied with the DDE
We’ve got our own source code in the form of c.main, so we don’t need to copy across c.exampleabs, but we do need the remaining files in the skeleton: Makefile, Mk, MkClean and MkDebug. If we copy these across to our application’s source folder (shown in Figure 5.1), we end up with the files shown in Figure 5.8.

Figure 5.8: The shared makefile components added to our application’s source
The makefile supplied with SkeletonABS is extremely simple:
# Makefile for exampleabs

COMPONENT = exampleabs

include CApp

# Dynamic dependencies:
Lines starting with # are comments; we can change the first to something more appropriate for our project. The # Dynamic dependencies: line is a little different, as it’s what Amu calls an active comment: we need to leave it intact for now, as its meaning will become apparent later on.
The include CApp line includes another makefile into this one: one called CApp that’s located in $.AcornC/C++.Makefiles. This is all handled transparently by the DDE, and is what makes Shared Makefiles work: the CApp makefile knows how to build a standard RISC OS application, so long as our file gives it the necessary information first. This means that it’s rarely necessary to write the ‘low level’ parts of a makefile when using Shared Makefiles.
This leaves COMPONENT = exampleabs as the only line which does anything specifically for our project. It sets a value for the COMPONENT variable, which the Standard Makefiles take to be the name of the project and – in the absence of any other information – the name of the single source file and the resulting output file. As supplied, the ExampleABS makefile would take the c.exampleabs source file (the one that we did not copy from the skeleton) and compile it to produce an executable file called exampleabs. Our source lives in the c.main file, so if we change the line to read COMPONENT = main Amu will find this and produce an absolute file called main.
There are a couple of other things that we need to do before our new Makefile will work, however. In CC, we were updating the Include field to read C:,OSLib:,SFLib:, and we need to do the same now. We do this by setting another variable called CINCLUDES, which the Standard Makefiles treat in the same way as CC treats the contents of the Include field. When called on the command line, CC takes these include values on the -I parameter, so with that at the start the full line reads CINCLUDES = -IC:,OSLib:,SFLib:.
The other thing that we had to manually configure in CC was to add SFLib and OSLib to the list of libraries to link against. Standard Makefiles use the LIBS variable to indicate these, so we need to add a line which reads LIBS = SFLib:o.SFLib OSLib:o.OSLib32 (note that while CINCLUDES uses commas to separate the list items, LIBS uses spaces). As in the CC front-end, the order in which the libraries are listed is important: SFLib uses OSLib, so it must appear before OSLib in the list.
With all the bits in place, the makefile should appear as shown in Listing 5.1.
Compiling with a makefile
With the changes in place as described above, the project is ready to be compiled using Amu. A full set of files can be downloaded in Download 5.2 – the archive no longer contains the empty o folder, as unlike CC the Shared Makefiles are able to create this on demand.
Compiling the project is simply a case of double-clicking on the Mk TaskObey file in the source folder. This should open a Task Window and, if all goes to plan, an absolute file called main should appear in the folder when the process is complete – along with the new o and od directories as shown in Figure 5.9. Double-clicking on main should cause our application to run, with exactly the same results as before.

Figure 5.9: The project folder after compilation
Unlike the output window used by CC in previous compilations, the Task Window that opened will contain all of the commands used to build the project. We can see commands to create the o and od folders, followed by a call to cc to compile c.main which throws up three warnings. As none of these were fatal, link is then called to link the resulting code with OSLib, SFLib and the standard C libraries before squeeze is used to squeeze the absolute file and reduce its size in a way that’s transparent to the user. The warnings are also reported in a throwback window, and the whole thing can be seen in Figure 5.10.

Figure 5.10: The completed Task Window, and Throwback output
The warnings themselves are not important: they are simply identifying three variables which are defined but not used by the code. If we check c.main, we will find that all three are arguments to functions which are required by the code that calls them: the C Runtime system in the case of the argv and argv parameters to main(), and SFLib’s Event library in the case of the message parameter to main_message_quit(). For now we’ll ignore these, as warnings of unused variables are often useful for spotting silly mistakes.
While we’re here, the MkDebug TaskObey file needs a mention. Its action is similar to Mk, in that it ‘makes’ the project – but it does so in a form ready to be used by the Desktop Debugging Tool, or DDT. While the use of MkDebug is outside the scope of these tutorials, it has been included to allow independent investigation with the help of the DDE documentation.
Cleaning up
Double-clicking on Mk created a number of new files in the project folder: the main executable file which is the application itself, and the o and od folders which are used to store intermediate object files containing compiled code which has yet to be linked. None of these are actually essential parts of the source code: Amu will ensure that they are all re-created as part of the build process.
In addition, although it might not be immediately obvious, Amu has also updated Makefile. We noted above that # Dynamic dependencies: line in the makefile was an active comment: if we load Makefile back into a text editor after double-clicking Mk, we’ll see that extra content has been added after this line as shown in Figure 5.11.

Figure 5.11: Dynamic dependencies created by Amu
The new lines are all dependencies in Amu terminology: that is, they describe in detail how the components that the compiler produces in the o folder ‘depend’ on each other. The key point of Amu is that it always tries to do as little work as possible: while our simple example only takes a few seconds to build from scratch, bigger RISC OS applications can take many minutes – or even hours, in some cases. As a result, Amu will compile each file in a project separately and store the results in o; when it is called to build the project again, it will attempt to only compile those files which have actually changed.
We can see this in action by double-clicking on Mk again. Assuming that nothing has been touched since the last time that it was run, we won’t see the result shown in Figure 5.10 this time around: Amu knows that there’s no point doing all of the work again as main already exists and is newer (in terms of its timestamp) than c.main. Instead, we simply get the output shown in Figure 5.12.

Figure 5.12: Amu won’t do anything that it doesn’t have to!
It’s not actually necessary to be able to read Amu’s dependencies in order to use them, as Amu sorts it all out for us. As long as we don’t change it, we can safely ignore anything after the # Dynamic dependencies: line in Makefile and leave Amu to re-create it each time we double-click on Mk. That said, the information added to the file is potentially useful to help understand what’s going on.
In our simple application we currently only have a single source file c.main, which Amu asks CC to compile into o.main. It should be fairly obvious, then, that if c.main changes, o.main needs to be rebuilt – the o.main: c.main at the top of the dependencies in Figure 5.11 simply says that o.main (before the colon) depends on c.main (after the colon).
The remaining lines are very similar, but are where the cleverness of dynamic dependencies really comes in to its own. Amu will ask CC to scan through c.main and look for any #include lines referencing other source files. In the case of c.main, it includes two additional files:
#include "oslib/wimp.h"
#include "sflib/event.h"
We can see that both of these are included in the dependencies: o.main: OSLib:oslib.h.wimp and o.main: SFLib:sflib.h.event. Both of these header files #include other files from OSLib, and that’s where the other entries to OSLib which follow them come from. If our project contained more source files than just c.main (as it will from the next chapter), Amu would sort out all those dependencies for us as well. The important thing is that we don’t have to worry about it!
With all of this automatically generated output (both in Makefile, and as files and folders in the project folder), it would useful to be able to reset everything back to its starting point. Once again the Standard Makefiles can do that, and the MkClean TaskObey file is provided for the purpose. Double-clicking on it will produce a Task Window similar to that shown in Figure 5.13; at the same time, the main application should disappear, along with the o and od folders. Loading Makefile back into a text editor should reveal that the dependencies shown in Figure 5.11 have gone.

Figure 5.13: Amu can also be used to clean a project folder
After double-clicking on MkClean, a double-click of Mk should result in a full build of the project as seen in Figure 5.10. Cleaning a project can be useful before sending the files to another developer (as there’s no need to waste space or bandwidth sending them files that their own compiler will generate for them), and can also be a good way to force a re-compile of everything. The latter can be very important when updating shared tools or libraries, such as OSLib, SFLib or even tools in the DDE itself.