Chapter 6: Onto the Iconbar
Now that we’ve got an application which can multitask in the background, and sorted out out build system so that we can quickly compile new versions of the code, we need to make it do something more visibly useful. Many RISC OS applications make their presence known by placing an icon on the iconbar, so that seems like a good place to start.
Getting iconic
Although they have a fairly specific meaning in user-facing documentation, as far as the Wimp and the applications which run on it are concerned, icons are simply objects which sit within windows. While some of these – such as file icons – might fit a user’s idea of an icon, many probably won’t. In fact, icons can contain text (in either the desktop font or any other), sprites, filled areas or any combination of these. Figure 6.1 shows a number of different icons within a window; it’s far from an exhaustive set!
![]()
Figure 6.1: Icons in RISC OS can take a whole range of forms
There’s scope for variation, but the icons that applications place on the iconbar are often simple images created from sprites. A number of common applications can be seen in Figure 6.2, and we can also see that it’s not unusal to use the same sprite both on the iconbar and for the application’s directory in the Filer. That said, the screenshot also contains Alarm, which is a good example of an application which uses a very different iconbar icon – but that’s something to worry about another time!

Figure 6.2: Applications often use the same icons in the Filer and on the iconbar
As is the case throughout RISC OS, the sprites used in icons must be held in sprite areas: blocks of memory which effectively represent the contents of sprite files. There are two options offered by the Wimp: an application can create its own area, or it can use a shared area known as the Wimp sprite pool. It’s possible to mix and match the two options within an application, and most will use both as appropriate.
The Wimp sprite pool is a sprite area which is shared between all applications: any application can add images to it, and make use of those that are stored there. Its communal nature means that it’s bad practice to add images which are only required by one application: once added, sprites can’t be removed without a reboot, and without care, conflicts are all too easy. RISC OS pre-loads the area with a range of useful icons, including the familiar parts of dialogue boxes seen in Figure 6.1. A small selection of the icons added by the Wimp can be seen in Figure 6.3.
![]()
Figure 6.3: A selection of sprites which are pre-loaded into the Wimp sprite pool
The duplication between the icons used for application directories and iconbar icons – seen in Figure 6.2 – is useful, because the Filer requires that application directory sprites must be stored in the Wimp sprite pool. If the same sprite is to be used in an iconbar icon, it makes sense to use the copy that’s already in memory to save using up space with a second copy. Conveniently, sprite icons default to using the Wimp sprite pool for their image – which makes things a lot easier!
We don’t yet have a sprite for our application – although we don’t really have the application itself yet, either! While we could design one, that’s a bit of a side issue at present. Instead we’ll take inspiration from the Filer which, when it can’t find a suitable icon to use for an application directory, uses a default image – the familiar sprite, called “application”, can be seen in Figure 6.3. As it’s always present in the Wimp sprite pool, we don’t need to do anything special to make use of it.
Getting in position
With the sprite sorted out (at least in theory), the other thing we need to decide is where the icon will be placed. The Wimp uses the same coordinate system as the rest of RISC OS: what are usually termed OS units. They start at (0,0) in the bottom-left of the screen and increase towards the right and top; on a standard system (where the user hasn’t changed the eigenvalues), there are two OS units for every pixel. This means that on an HD screen of 1920 × 1080, there will be 3840 × 2160 OS units on the screen: 0 to 3839 horizontally and 0 to 2159 vertically, as shown in Figure 6.4.
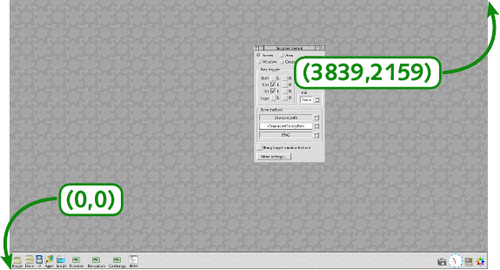
Figure 6.4: By default, a 1920 1080 screen contains 3840 2160 OS units
Icons are components of windows, however: when a window (such as a dialogue box) is moved around the screen, the icons move with it. This means that their locations are specified in relative terms with reference to the window itself. The units are still OS units, but they are no longer counting from the bottom left corner of the screen. A window’s origin can be moved around, but by default it is at its top left – as we’ll see when we look properly at windows, this means that the y coordinates of icons are often negative. The position of an icon is given in terms of two coordinate pairs: the minimum x,y (or bottom left, usually written “x0,y0”), and the maximum x,y (or top-right, usually written “x1,y1”). While x0 and y0 are inclusive, in that they point to the bottom-left pixel in the icon, x1 and y1 are exclusive: they indicate the pixel diagonally above and to the right of the top-right pixel of the icon.
As far as applications are concerned, the iconbar is just another window: only it’s one that the Wimp owns and shares out between all the applications which have created an iconbar icon. The sharing makes things a little odd, as the horizontal position of an icon will depend on what else is already loaded (and it can change after the icon has been created, if another application removes its icon).
This horizontal movement means that the minimum x coordinate (x0) of an iconbar icon is always given as zero: the Wimp will adjust it into its real position when the icon is actually created. The maximum x coordinate (x1) therefore gives the width of the icon. Vertical coordinates work normally, but the Wimp has moved the origin of the iconbar’s coordinates so that zero is on the baseline of standard ‘sprite only’ icons. This means that the minimum y coordinate (y0) will also be zero for the kind of icon we’re planning – so once again, the maximum y coordinate (y1) gives the height of the icon.
The standard application sprites used on RISC OS are defined to be 34 × 34 pixels, or 68 × 68 OS units. This means that our new icon must also be 68 OS units in each direction, making it occupy OS units 0 to 67. If the minimum, inclusive, x and y coordinates are (0,0), this means that the maximum, exclusive, coordinates will be (68,68). This is shown graphically in Figure 6.5
![]()
Figure 6.5: Creating a 34 34 pixel icon on the iconbar
Making the icon
Icons are created using the Wimp_CreateIcon SWI, which has the following prototype in OSLib:
extern wimp_i wimp_create_icon(
        wimp_icon_create const *icon
);
It takes a single parameter, which – as with SWIs like Wimp_Poll which we’ve aleady met – is a pointer to a block of memory.
struct wimp_icon_create {
        wimp_w          w;
        wimp_icon       icon;
};

typedef struct wimp_icon_create wimp_icon_create;
The block contains details of the icon that we wish to create, and consists of two items. The first is the variable w, which has the type of wimp_w and is known as a window handle: every window on the RISC OS desktop has a handle, which uniquely identifies it. We’ll meet window handles properly later on, when we come to look at windows – for now, we don’t need to worry about it too much. We’ve already said that the Wimp treats the iconbar as a special window, and that extends to giving it some ‘special’ window handles: it should come as no surprise that OSLib provides some constants for use with Wimp_CreateIcon.
#define wimp_ICON_BAR_RIGHT     ((wimp_w) 0xFFFFFFFFu)  /* -1   */
#define wimp_ICON_BAR_LEFT      ((wimp_w) 0xFFFFFFFEu)  /* -2   */
If we give the window handle as wimp_ICON_BAR_RIGHT, our icon will be created on the right-hand side of the iconbar – the correct place for a normal application. Using wimp_ICON_BAR_LEFT would create the icon on the left-hand side, which is reserved for applications corresponding to hardware or storage and is not the right place for us.
The other item in the block is the variable icon, of type wimp_icon – the definition of the icon itself. OSLib defines wimp_icon as follows:
struct wimp_icon {
        os_box          extent;
        wimp_icon_flags flags;
        wimp_icon_data  data;
};

typedef struct wimp_icon wimp_icon;
The structure that underlies the type contains three items: the wimp_icon.extent or position of the icon in the window, wimp_icon.flags which define the icon’s appearance and behaviour, and wimp_icon.data which holds details of the icon’s contents.
As we saw above, the icon’s extent is from (0,0) inclusive to (68,68) exclusive: 68 OS units and 34 pixels in each direction. The RISC OS API has a fairly standard way to give the details of two-dimensional areas like this, which takes the form of four consecutive four-byte words holding the minimum x, minimum y, maximum x and maximum y coordinates in turn. OSLib provides us with the os_box type to give access to this:
struct os_box {
        int             x0;
        int             y0;
        int             x1;
        int             y1;
};

typedef struct os_box os_box;
An icon’s flags determine how it looks and behaves. We’ll cover the options properly when we take a full look at icons in Chapter 14, but our iconbar icon is fairly simple: it consists of a sprite, and if it’s to be of any use, we need to be told when the user clicks on it. In OSLib’s terms, this means that it will need the wimp_ICON_SPRITE flag set, and must have the button type of wimp_BUTTON_CLICK.
The final piece of the icon definition is its data, which in the case of a wimp_ICON_SPRITE icon is the name of a sprite from the Wimp pool which should be used. The wimp_icon_data type is actually a union which contains – amongst other items related to different icon configurations – a char sprite[12] to hold the name of the sprite. We can copy a sprite name into this string when initialising the icon data, and leave the Wimp to do the rest of the work of finding the correct image from the Wimp sprite pool for us.
Modular code
Getting our application to place its icon on the iconbar requires a few changes to the code, which will start to show the differences between BASIC and C. The iconbar icon is a self-contained part of the application, and therefore we want to keep it separate from other parts of the code. To this end, we’ll put it into a separate source file, so that other sections of the application can only see it via interfaces that we define.
The first thing we need to do is create a new source file called c.ibar, as shown in Listing 6.1, containing the code we’ve discussed so far.
/**
 * Example 6.1
 *
 * (c) Stephen Fryatt, 2015
 *
 * File: ibar.c
 */

#include "oslib/wimp.h"
#include <string.h>

#include "ibar.h"

/* Iconbar Initialisation. */

void ibar_initialise(void)
{
        wimp_icon_create icon_bar;

        icon_bar.w = wimp_ICON_BAR_RIGHT;
        icon_bar.icon.extent.x0 = 0;
        icon_bar.icon.extent.y0 = 0;
        icon_bar.icon.extent.x1 = 68;
        icon_bar.icon.extent.y1 = 68;
        icon_bar.icon.flags = wimp_ICON_SPRITE | (wimp_BUTTON_CLICK << wimp_ICON_BUTTON_TYPE_SHIFT);
        strncpy(icon_bar.icon.data.sprite, "application", osspriteop_NAME_LIMIT);

        wimp_create_icon(&icon_bar);
}
Listing 6.1 (c.ibar): The code to create our iconbar icon
Like a lot of OSLib, declaring a variable of the wimp_icon_create type automatically reserves the required space on the stack for the parameter block, meaning that we just need to set the contents up before passing its address to wimp_create_icon().
As described, the code sets the handle of the window in which the icon is to be created to be the right-hand side of the iconbar, then sets up the x and y coordinates for the bottom-left and top-right corners. The flags are set to make the icon a sprite which responds to mouse clicks (we’ll cover the detail of this when we look properly at icons), and finally "application" is copied in to the space provided for the sprite name so that we use the default “application” sprite provided by the OS. The call to wimp_create_icon() actually puts the icon on to the iconbar.
The ibar_initialise() function needs to be called as the application starts up, which means adding a call to it from main_initialise() in c.main. To be able to do that, there needs to be a function prototype that’s visible to c.main – we therefore need to create a h.ibar header file to go with our new code. The contents can be seen in Listing 6.2: it simply contains a function prototype for ibar_initialise().
/**
 * Example 6.1
 *
 * (c) Stephen Fryatt, 2015
 *
 * File: ibar.h
 */

#ifndef EXAMPLEAPP_IBAR
#define EXAMPLEAPP_IBAR

/* Iconbar Initialisation. */

void ibar_initialise(void);

#endif
Listing 6.2 (h.ibar): The header file to define the ibar module’s interface
With c.ibar and h.ibar in place, we can now update c.main to make the necessary call to the ibar module. First, we need to #include the h.ibar header file, so that the new function prototype is seen: this goes at the top of the file, along with the other #include lines.
#include "oslib/wimp.h"
#include "sflib/event.h"

#include "ibar.h"
Second, we need to update main_initialise(), so that it initialises the ibar module once everything else is set up.
static void main_initialise(void)
{
        wimp_initialise(wimp_VERSION_RO3, "Example App", NULL, NULL);

        event_add_message_handler(message_QUIT, EVENT_MESSAGE_INCOMING, main_message_quit);

        ibar_initialise();
}
Putting these changes into the existing file results in the code seen in Listing 6.3.
/**
 * Example 6.1
 *
 * (c) Stephen Fryatt, 2015.
 *
 * File: main.c
 */

#include "oslib/wimp.h"
#include "sflib/event.h"

#include "ibar.h"

/* Global Variables */

static osbool main_quit_flag = FALSE;

/* Function Prototypes */

static void main_initialise(void);
static void main_poll(void);
static void main_terminate(void);
static osbool main_message_quit(wimp_message *message);

/* Main code entry point. */

int main(int argc, char *argv[])
{
        main_initialise();
        main_poll();
        main_terminate();

        return 0;
}

/* Global application initialisation. */

static void main_initialise(void)
{
        wimp_initialise(wimp_VERSION_RO3, "Example App", NULL, NULL);

        event_add_message_handler(message_QUIT, EVENT_MESSAGE_INCOMING, main_message_quit);

        ibar_initialise();
}

/* Wimp_Poll loop. */

static void main_poll(void)
{
        wimp_block      blk;
        wimp_event_no   reason;
        int             pollword;

        while (!main_quit_flag) {
                reason = wimp_poll(wimp_MASK_NULL, &blk, &pollword);

                event_process_event(reason, &blk, pollword, NULL);
        }
}

/* Global application termination. */

static void main_terminate(void)
{
        wimp_close_down(0);
}

/* Message_Quit event handler. */

static osbool main_message_quit(wimp_message *message)
{
        main_quit_flag = TRUE;

        return TRUE;
}
Listing 6.3 (c.main): Using the event dispatcher
There’s one other change that we need to make, to help the compiler find the new files. The makefile that we have used up to now only allows for a single source file, called main.c – the same as the name of the absolute file that the compiler generates. With two source files, this is no longer sufficient for our needs.
Fortunately, the Standard Makefile system allows more complex configurations to be described by using the OBJS variable to list the intermediate object files that the compiler should generate in the o folder – and hence the original source files contained in the c folder. Adding a line reading OBJS = main ibar tells Make that it should be compiling two source files – c.main and c.ibar – into two object files: o.main and o.ibar. The h.ibar header file is found via the #include lines in the source files.
As we’re now specifying the source and object files directly via OBJS, there’s no longer any need to limit the name of the project as set by the COMPONENT variable. We can therefore take the opportunity to change the name of the output file, created by linking the object files from the o folder with the libraries we’re using, by changing the line that sets the variable to read COMPONENT = ExampleApp.
Putting this together results in the makefile shown in Listing 6.4. Having separated the details of the input and output files, it’s clearer what’s going on – this file will form the basis of our project going forward.
# Makefile for Example App

COMPONENT = ExampleApp

OBJS = main ibar

CINCLUDES = -IC:,OSLib:,SFLib:
LIBS = SFLib:o.SFLib OSLib:o.OSLib32

include CApp

# Dynamic dependencies:
Listing 6.4 (Makefile): The updated Makefile, including the new source file
Testing it out
With the updates described above, the project folder should look as shown in Figure 6.6 – after MkClean has been run, if necessary. If there’s a copy of the Absolute main file left from a previous compilation, it can safely be deleted: now that we’ve altered the Makefile to change COMPONENT from ‘main’ to ‘ExampleApp’, it won’t be removed automatically.

Figure 6.6: The project folder before compilation
Running Mk should now create a new Absolute file named ExampleApp which, when double-clicked, should install itself on the iconbar as seen in Figure 6.7. At present the iconbar icon won’t interact with the user at all, so the application will need to be quit via the Task Manager in the same way as previous examples – we’ll start to deal with that in the next chapter.

Figure 6.7: Our simple example application creates an unresponive iconbar icon
A full set of files for the iconbar changes can be found in Download 6.1.