Chapter 19: Window Templates
Whilst it’s possible to define all of the windows and icons within our C code, as we have been doing so far, this quickly becomes complicated. Aside from the difficulty of keeping track of the visual design of the windows, the sheer number of memory buffers for indirected icons and validation strings is soon hard to keep track of and maintain.
We could write a library to help us with the task, but the Wimp already contains code to do this in the form of window templates. Before our example application grows too large, now is the time to move it over to use this alternative system.
The first thing that we will need is a template editor: an application dedicated to designing window templates. If you have come here from writing applications in BASIC, then you might already have your own favourite – there are many to choose from. Options include titles such as Dick Alstein’s TemplEd and even Acorn’s FormEd for the purists, but here we will be using WinEd from Tony Houghton, Adam Richardson and myself. All of the editors generate the same template files, so it really is a matter of personal preference.
If you choose to use another editor to create the example templates here, make sure that you get the window and icon details (names, numbers, flags and text buffer sizes) the same. There is a full copy of the application, which includes the templates, in Download 19.1 towards the end of the page.
A new template file
Load WinEd on to the iconbar in the conventional way, and click on its icon to open a new template file browser window – as seen in Figure 19.1. This will show all of the window definitions contained in our templates file as we build the application up.
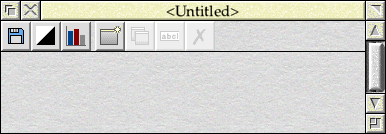
Figure 19.1: A new, empty WinEd template file browser
Click Menu over the window and slide over Create to open the Create window dialogue (or just click on the create window button in the toolbar). We need to give the template a name, which is used to identify the different windows when we come to load them in our application – these are largely arbitrary, so let’s enter Main since this could be the main ExamplApp window (see Figure 19.2). After clicking on Create, a new window called “Main” will appear in the WinEd browser.
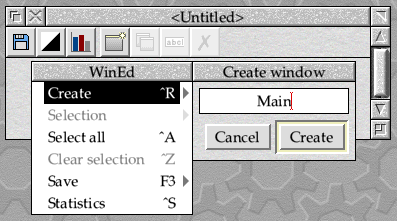
Figure 19.2: Creating a new window template
Double-clicking on this new “Main” window will open it for editing, along with a selection of other tool windows seen in Figure 19.3. In editing mode like this, windows always have a full set of scrollbars, along with WinEd’s toolbar attached to the left-hand side.
To the right are a couple of other useful windows. At the top is the Monitor, which shows the details of the window and icon under the pointer. Its toggle size icon allows it to be expanded to also show the size and position of the icon under the pointer, which is how it appears in the screenshot. Below it is the Icon picker, which contains a number of ready-made icons that we might wish to use in our design.
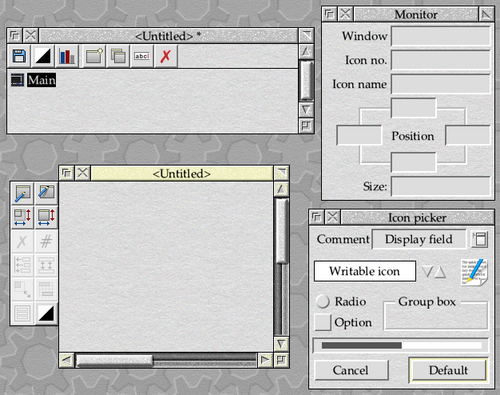
Figure 19.3: The windows on screen when working with WinEd
We are going to recreate the window with the three radio icons in it, as found in Download 18.4, so the first thing for us to do is to set the window title. Click Menu over the window being edited and choose Edit title... to open the Edit title dialogue seen in Figure 19.4. The dialogue layout is the same as the one used for icons, which we’ll meet later – this reflects the fact, which we’ve previously noted, that window titles are effectively cut-down icons with some options unavailable.
All that we need to do is to enter our title (which was Hello World! in the old window) in to the Text/sprite field. The other settings can all stay at their defaults for now, and clicking on Update will store the change. The window should update on screen immediately.
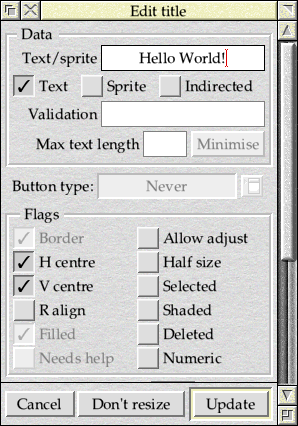
Figure 19.4: The window title can be edited easily
Next we need to add the radio icons. There is one in the Icon picker, so use Select to drag a copy over to the window being edited. This should appear as seen in Figure 19.5.
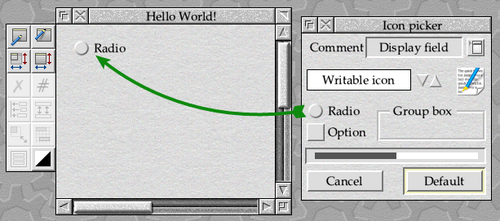
Figure 19.5: The first radio icon in the window
Creating the second and third icons can be done by copying the first one placed in the window: hold down Shift and then drag it with Select to create a copy, then repeat the process to create another. Hovering the mouse over each should show in the Monitor that they have icon numbers 0, 1 and 2, as seen in Figure 19.6. If necessary, drag them around using Select (without Shift held down) so that they are in order with 0 at the top and 2 at the bottom. Don’t worry about spacing or alignment at the moment.
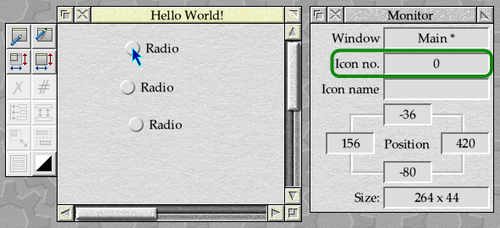
Figure 19.6: Hovering over the icons will show their numbers in the Monitor
Now select all three icons: this can either be done by dragging a box around them with Select, or by clicking on the first with Select and the other two with Adjust. Open the menu and choose Selection → Align... to open the Align icons dialogue seen in Figure 19.7. We want to align them to the left, moving the icons without resizing them, and moving left to achieve it; click on Align to proceed.
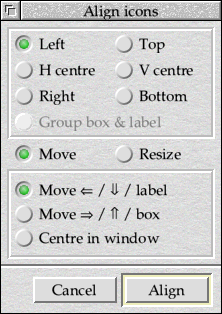
Figure 19.7: Aligning the selected icons
Next we need to space the icons out in the window. The Style Guide requires option and radio icons to be 44 OS units high, which the template icons in WinEd already are, and to be spaced out with gaps of 8 OS units between each pair. With the three icons still selected, choose Selection → Space out... from the menu to open the Space out dialogue seen in Figure 19.8.
We need to space out From top, and WinEd sets the Gap to be the required 8 OS units by default. Simply click Space out to arrange the icons in the window.
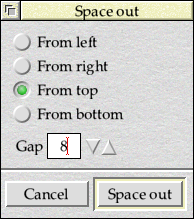
Figure 19.8: Spacing the selected icons out
With the icons now aligned and spaced out correctly, we can check that they’re all still selected and drag them into the top-centre of the window. Once they have been deselected, it should look a bit like Figure 19.9.
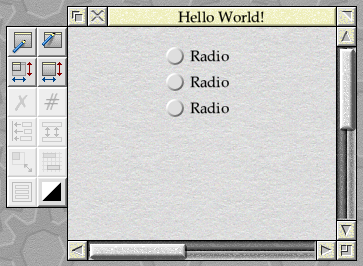
Figure 19.9: Three radio icons, neatly aligned
We now need to add the display field below the radio icons. Again, the Icon picker comes to our aid: select the Display field at the top by clicking with Select, then add in the Comment to its left by clicking with Adjust. Drag the resulting pair of icons across into our window, and drop it roughly centrally below the radio icons, something like Figure 19.10. If you need to move them, select them both and drag them around together. Hovering over the icons should show that the Display field is icon number 3 while the Comment is icon number 4, as seen in the screenshot.
We’ve added a label for the field (the Comment), because with window templates there is little reason not to do so. Up to now, we would have had to create another icon using some dedicated C code, and looked after memory allocations; here, the Wimp will sort most of it out for us when the templates are loaded into the application.
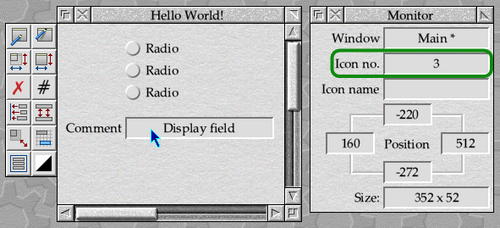
Figure 19.10: Adding the display field
So far, the icons that we have dropped into the window are visually correct but still need to be fully configured to match the ones that we created in our application. This is very important: just as we would edit the icon_definition that was passed to Wimp_CreateIcon in the old program, here we need to make sure that all of the flags, indirected buffers, validation strings and so on are correct.
Double-click on the top radio icon (the one with an icon number of 0), to open the Edit icon dialogue box seen in Figure 19.11. If we go back and check the definition used in our program, we will see that it looked like this:
icon.extent.x0 = 100;
icon.extent.y0 = ypos - 44;
icon.extent.x1 = 500;
icon.extent.y1 = ypos;
icon.flags = wimp_ICON_TEXT | wimp_ICON_SPRITE |
                wimp_ICON_INDIRECTED | wimp_ICON_VCENTRED |
                (wimp_BUTTON_RADIO << wimp_ICON_BUTTON_TYPE_SHIFT) |
                (1 << wimp_ICON_ESG_SHIFT) |
                (wimp_COLOUR_BLACK << wimp_ICON_FG_COLOUR_SHIFT) |
                (wimp_COLOUR_VERY_LIGHT_GREY << wimp_ICON_BG_COLOUR_SHIFT);

icon.data.indirected_text_and_sprite.text = buffer;
icon.data.indirected_text_and_sprite.size = WIN_ICON_TEXT_LEN;
icon.data.indirected_text_and_sprite.validation = "Sradiooff,radioon";
The four values in icon.extent depend on the position of the icon in the window, and are taken care of by the more WYSIWYG aspect of WinEd. This is one of the advantages to using a template editor!
Moving on to the flags, we have wimp_ICON_TEXT, wimp_ICON_SPRITE and wimp_ICON_INDIRECTED set, and these correspond to the Text, Sprite and Indirected options in the Data area at the top of the dialogue; they were already ticked in WinEd’s default icon, as there isn’t really any other way to create a radio icon. The wimp_ICON_VCENTRED flag is also set, and looking at the Flags section of the dialogue, we can see that V centre is also ticked – again, because the WinEd icon template for a radio icon had it set.
Of the other flags, the button type was set to wimp_BUTTON_RADIO; in the WinEd dialogue, Button type is also Radio. The foreground and background colours are set to wimp_COLOUR_BLACK and wimp_COLOUR_VERY_LIGHT_GREY respectively, which match the Foreground colour and Background colour fields in WinEd. The ESG was set to 1, and again, WinEd has the ESG field set to 1. This is the benefit of using icons from WinEd’s Icon picker.
The remainder of the Data area needs a little more thought. The Text/sprite field at the top sets the contents of the 12 bytes of icon data for non-indirected icons, but for indirected icons it sets the value copied in to the main indirected buffer. In the case of our original code, this was the value pointed to by the *text parameter, which we copied into the allocated buffer with
strncpy(buffer, text, WIN_ICON_TEXT_LEN);
buffer[WIN_ICON_TEXT_LEN - 1] = '\0';
We can therefore set the value to Option icon 1. The buffer itself was the pointer that we passed into our function with the *buffer parameter, defined globally as
static char win_radio_icon_1_text[WIN_ICON_TEXT_LEN];
Our code set icon.data.indirected_text_and_sprite.text to the buffer pointer, and ensured that the Wimp knew the length by setting icon.data.indirected_text_and_sprite.size to the value WIN_ICON_TEXT_LEN.
For this template, the Wimp will sort out the allocation for us (and then set icon.data.indirected_text_and_sprite.text accordingly) when we load the template file, so long as we tell it how much space is needed by setting icon.data.indirected_text_and_sprite.size in the templates: in WinEd, this is done with the Max text length field. In our program, we just allocated WIN_ICON_TEXT_LEN bytes for each buffer to keep things simple. For an icon like this radio icon, where the text will not change, we can use WinEd’s ability to Minimise the buffer to the smallest required: in this case, 14 bytes.
Finally, we set icon.data.indirected_text_and_sprite.validation to point to our validation string of “Sradiooff,radioon” – in WinEd, this is set using the Validation field when a validation string is required.
When we are happy with the settings, we can click on Update to set the values and resize the icon to suit the text that it contains; to leave the size unchanged, Don’t resize can be used instead.
![]()
Figure 19.11: Editing one of the radio icons
This process can be repeated for the other two radio icons, setting their Text/sprite fields to Option icon 2 and Option icon 3 respectively.
The next icon to edit is the Comment label. As with the radio icons, the WinEd defaults are fine and we just need to change the Text/sprite field to Status.
The Display field is the last icon to edit. Again the defaults are mostly fine: the validation string of “R2” uses the R validation command that we met in Section 15.7 to create the sunken effect that the Style Guide requires, and the Wimp will sort out the memory allocation for us. The catch here is that our code will be changing this icon’s contents, so the text buffer must be large enough. As with the radio icons, our code allocated WIN_ICON_TEXT_LEN bytes, which was defined as 100. We can therefore enter 100 in the Max text length field before clicking Update to keep the field the same size – don’t click on Minimise!
Choosing the size of any indirected buffers which can be altered by our code will invariably involve careful checking of the text which is to be written in to them, combined with an element of guesswork. So long as any routines that we use to write to them always use the length field to ovoid overflowing the allocated space, the worst that can happen is that text might appear truncated – which can be picked up during testing. We will discuss bounds checks below, and more thoroughly in Chapter 20.
With these changes done, the window design is complete – and should look something like that in Figure 19.12. It is now safe to click on the close icon to close the window down.
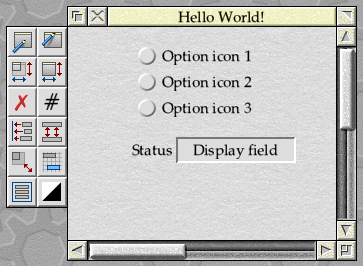
Figure 19.12: The completed window design
Before closing the WinEd file browser, we need to save the templates file. Open the browser menu, slide over Save and save the file as Templates into the !ExamplApp application directory. This isn’t quite the right place to put the file, but we’ll sort that out later on when we have filled some more gaps in our knowledge.
Reading our file
Now that we have a template file, we will need to re-work our application to make use of it. The Wimp provides three SWIs to manipulate the files: Wimp_OpenTemplate to open them, Wimp_LoadTemplate to read window templates in to memory, and Wimp_CloseTemplate to close the file again afterwards. The process is slightly quirky, and it is important to note that it does not multitask: a template file should never be held open across a call to Wimp_Poll.
Opening and closing a template file is simple enough, and OSLib defines the two SWIs as follows:
extern os_error *xwimp_open_template(char const *file_name);
extern void wimp_open_template(char const *file_name);

extern os_error *xwimp_close_template(void);
extern void wimp_close_template(void);
At present, our main_initialise() function calls the ibar_initialise() and win_initialise() functions to allow the individual code modules to set themselves up. It would make sense for us to open the templates file before doing this, and the close it afterwards – which we can achieve as shown in Listing 19.1.
static void main_initialise(void)
{
        os_error *error;

        wimp_initialise(wimp_VERSION_RO3, main_application_name, NULL, NULL);

        error_initialise(main_application_name, main_application_sprite, NULL);

        event_add_message_handler(message_QUIT, EVENT_MESSAGE_INCOMING, main_message_quit);

        /* Open the templates file. */

        error = xwimp_open_template("<ExamplApp$Dir>.Templates");
        if (error != NULL)
                error_report_program(error);

        /* Initialise the program modules. */

        ibar_initialise(main_application_sprite);
        win_initialise();

        /* Close the templates file. */

        wimp_close_template();
}
Listing 19.1: Opening the template file
There are a few things to note about the code. First, we’re using the ExamplApp$Dir system variable that we previously added to locate the Templates file. For now, we can let the Wimp worry about expanding the variable, and simply include it as part of the filename.
We do not assume that the file will open cleanly and without error, but instead call the X version of the Wimp_LoadTemplate SWI and catch any error that results. The error_report_program() is part of SFLib’s errors library, which we introduced in Section 10.4. This reports any error block that it is given as a program error, which is the most serious type of error recognised by the Wimp, and then exits the application. If the template file fails to load, there isn’t much more that our application can do about it, so the best approach is simply to report what the error was and then give up.
Finally, there is an assumption that both ibar_initialise() and win_initialise() will return, so that the call to wimp_close_template() can be made. This could be a problem, because ibar_initialise() makes a call to wimp_create_icon() when it creates the iconbar icon – but no attempt is made to catch any errors, despite the act of creating an icon having the potential to fail. The Programmer’s Reference Manual is clear that Wimp_CloseTemplate should always be called if Wimp_OpenTemplate succeeded – even if errors occur while the template file is open.
To fix this, we can amend ibar_initialise() as shown in Listing 19.2.
void ibar_initialise(char *sprite)
{
        os_error *error;

        wimp_icon_create icon_bar;

        icon_bar.w = wimp_ICON_BAR_RIGHT;
        icon_bar.icon.extent.x0 = 0;
        icon_bar.icon.extent.y0 = 0;
        icon_bar.icon.extent.x1 = 68;
        icon_bar.icon.extent.y1 = 68;
        icon_bar.icon.flags = wimp_ICON_SPRITE | (wimp_BUTTON_CLICK << wimp_ICON_BUTTON_TYPE_SHIFT);
        strncpy(icon_bar.icon.data.sprite, sprite, osspriteop_NAME_LIMIT);

        error = xwimp_create_icon(&icon_bar, NULL);
        if (error != NULL) {
                error_report_error(error->errmess);
                return;
        }

        event_add_window_mouse_event(wimp_ICON_BAR, ibar_mouse_click);
}
Listing 19.2: Adding error handling to the iconbar code
Now, instead of calling Wimp_CreateIcon and hoping that there is no error, we call the X version and check for an error block being returned. If one is (if error is not NULL), then we report the problem and exit the function.
It’s worth explaining the call to xwimp_create_icon() – in particular, where the NULL has come from. Back in Section 6.4, we saw that wimp_create_icon() took a pointer to a wimp_icon_create structure and returned an icon handle. Since the X version returns an os_error pointer, the icon handle needs to be returned via another route and OSLib always does this using additional parameters which take pointers to variables in which we would like values to be stored. In this case, the prototype shows that the second parameter is a pointer to a variable of type wimp_i, where the new icon handle would be placed.
extern os_error *xwimp_create_icon(
        wimp_icon_create const *icon,
        wimp_i *i
);
If we were required to pass a pointer in for each possible return value, then this could quickly get cumbersome for SWIs which return several values that we’re not interested in. Fortunately OSLib allows us to pass a NULL pointer in any return value position, to indicate that we’re not interested in having that value sent back to us.
Loading a template
With the template file open, we now need to load the window that we designed. Loading a window template with Wimp_LoadTemplate is a two stage process, requiring us to identify how much memory is required before loading the definition in to memory. The SWI is defined by OSLib like this:
extern os_error *xwimp_load_template (
        wimp_window *window,
        char *data,
        char const *end,
        byte *font_ref,
        char *name,
        int context,
        int *used,
        int *data_used,
        int *context_out
);
It’s a slightly quirky call, so we’ll go through the parameters first before looking at how it gets used. To make it easier to compare to other documentation, we’ll describe the parameters in terms of the SWI’s registers as well as the parameters in the OSLib function.
On entry, R1 (which corresponds to the *window parameter) should contain a pointer to a block of memory into which the Wimp will load the wimp_window structure defining our window – this is what will replace the window definition that we have been using so far (as introduced in Chapter 12). Since we don’t know how big this block might be, we can ask the Wimp to tell us by instead passing in a value which is less than or equal to zero; OSLib defines a constant for this purpose as follows:
#define wimp_GET_SIZE ((wimp_window *) 0x0u)
When it loads a window template into memory, the Wimp will sort out the associated indirected icon buffers and validation strings for us, by creating them in a memory buffer and updating the wimp_window block so that all of the pointers work correctly. We need to supply a block of memory for this, too, and we do that in R2 (which corresponds to the *data parameter). As with the previous block of memory, the Wimp will tell us how big the indirected data block needs to be if R1 is less than or equal to zero.
The Wimp will bounds-check this indirection data, so R3 (which corresponds to the *end parameter) should point to the byte in memory after the last byte allocated for the workspace supplied in R2. The SWI will not bounds check the template itself as it is loaded into the buffer supplied in R1 – which is why many template editors will tell you the size of the largest window definition.
R4 (which corresponds to the *font_ref parameter) takes a pointer to a font reference array, in case we wish to use outline fonts in our icons. This is something that we haven’t looked at yet, and there are actually very few places that it is even useful to do so these days; fortunately, we can pass −1 to indicate that no fonts are required. OSLib defines a constant for this:
#define wimp_NO_FONTS ((byte *) 0xFFFFFFFFu)
To tell the SWI which template we wish to load, R5 (which corresponds to the *name parameter) points to a buffer holding the template name. The Programmer’s Reference Manual notes that this should be 12 bytes and word-aligned, but in practice this is only the case if we use a wildcard in the name: the Wimp will then write the full name of the template found into the buffer before the SWI returns.
Finally, R6 (which corresponds to the context parameter) indicates the position in the file at which the SWI should start searching for our template. The templates in the file are treated as if numbered sequentially starting from one, so to search the whole file we should always pass zero in this parameter. If we were using a wildcard in the template name, we could use the returned context in another call in order to continue searching through the file; when the returned context is zero, we know that the end of the file has been reached.
On exit from the SWI, R6 will be updated to contain the index into the file at which the template was found (the “context”); if the template is not found, the returned value will remain zero. We can supply a pointer to a variable to take this value in the *context_out parameter, and since it is the only way to check that our template was found, it is important that we do!
The values in R1 and R2 will be updated by the SWI on exit, too; if we asked for the buffer sizes by setting *window to wimp_GET_SIZE on entry, then this is how we read the sizes back. We can provide pointers to two integer variables in the *used and *data_used parameters to retrieve them.
There’s quite a lot of work to do with Wimp_LoadTemplate, so we will defer to SFLib’s windows_load_template() to implement it. This is defined as shown in Listing 19.3.
wimp_window *windows_load_template(char *name)
{
        wimp_window     *window_def = NULL;
        byte            *ind_data = NULL;
        int             def_size, ind_size, context = 0;
        os_error        *error;

        /* Call Wimp_LoadTemplate to request the amounts of memory required. */

        error = xwimp_load_template(wimp_GET_SIZE, 0, 0, wimp_NO_FONTS, name, 0,
                        &def_size, &ind_size, &context);
        if (error != NULL || context == 0)
                return NULL;

        /* Allocate the memory and verify that it was available. */

        window_def = malloc(def_size);
        ind_data = malloc(ind_size);

        if (window_def == NULL || (ind_size > 0 && ind_data == NULL)) {
                if (window_def != NULL)
                        free(window_def);
                if (ind_data != NULL)
                        free(ind_data);

                return NULL;
        }

        /* Call Wimp_LoadTemplate again to load the template into our memory. */

        error = xwimp_load_template(window_def, (char *) ind_data, (char const *) ind_data+ind_size,
                        wimp_NO_FONTS, name, 0, NULL, NULL, &context);
        if (error != NULL || context == 0) {
                if (window_def != NULL)
                        free(window_def);
                if (ind_data != NULL)
                        free(ind_data);

                return NULL;
        }

        return window_def;
}
Listing 19.3: SFLib's code for loading a template
The process is in three parts. We begin by calling Wimp_LoadTemplate to ask the Wimp how much memory we will need for each of the two buffers in order to load the window template. As discussed above, the call returns the size of the two blocks in bytes, in the two variables def_size and ind_size respectively. If anything goes wrong, then either an error pointer will be returned or the context will be zero. In either case, windows_load_template() will return NULL.
The next step is to claim the two memory blocks with malloc(), using the sizes provided by the SWI – again returning NULL if either allocation fails. Finally, Wimp_LoadTemplate is called for a second time, this time being given the two blocks of memory to load the template and indirected data in to. The Wimp will load the window definition, then set up all of the memory buffers and validation strings for us. Once more, any error results in the memory being freed and NULL being returned by windows_load_template().
Creating the window
If everything worked as expected, then a pointer to the wimp_window block is returned by windows_load_template(). This is the same as the one that we have been creating by hand in win_initialise(), except that all of the icons definitions are included at the end – just as we hinted could be done back in Section 12.6. This means that Wimp_CreateWindow will create all of the icons at the same time as the window, instead of our having to call Wimp_CreateIcon for each one – less work for us!
To update c.win, we can first delete the prototypes and definitions for win_create_radio_icon() and win_create_info_icon(). We are no longer creating our icons by hand, so these functions are unnenecssary. We can also delete the definition of WIN_ICON_TEXT_LEN, and replace it with the following definitions shown in Listing 19.4.
/* Main Window Icons. */

#define WIN_ICON_OPTION1 0
#define WIN_ICON_OPTION2 1
#define WIN_ICON_OPTION3 2
#define WIN_ICON_INFO 3
Listing 19.4: The constants for the icon handles
These show the icon handles from the window definition in the template file, and will need to be kept up to date if the window template changes. It’s a good idea to define them once like this, instead of having to search the code for hard-coded references to the icon handles! A number of the global variable definitions can also be discarded, although we do need to retain the win_handle, win_width and win_height definitions seen in Listing 19.5.
/* Global Variables */

static wimp_w win_handle;

static int win_width, win_height;
Listing 19.5: The reduced global variable list
The win_initialise() function now looks as seen in Listing 19.6.
void win_initialise(void)
{
        wimp_window *window_definition;

        /* Load and create the window. */

        window_definition = windows_load_template("Main");
        if (window_definition == NULL) {
                error_report_error("Failed to load Main template");
                return;
        }

        win_width = window_definition->visible.x1 - window_definition->visible.x0;
        win_height = window_definition->visible.y1 - window_definition->visible.y0;

        win_handle = wimp_create_window(window_definition);
        free(window_definition);

        /* Register event handlers. */

        event_add_window_mouse_event(win_handle, win_mouse_click);
}
Listing 19.6: Loading the main window template
The window template is loaded into a wimp_window block, which is then passed to wimp_create_window(). All of the complexity of the block’s contents is now handled in a WYSIWYG way by our template editor, instead of having to change the values in the wimp_window structure by hand. The wimp_window block was claimed using malloc() in windows_load_template(), so we free it after use to avoid leaking memory.
As an aside, having the icon definitions contained the window definition means that the icon count referred to in Section 12.6 and stored in window_definition->icon_count will now be greater than zero: in fact, it should be 5, to reflect that the window contains five icons with handles 0 to 4. The icon definitions themselves appear as an array of wimp_icon blocks, which can be accessed through window_definition->icons[].
Updating the status field
There is still one fly in the ointment. Previously in win_mouse_click(), we had been writing the status text direct to the icon buffer using the global variable. Now we can’t do that, because the Wimp has set up the indirected buffer somewhere in the memory that we supplied to Wimp_LoadTemplate and we don’t know the address. Instead, we will need to use a different approach as shown in Listing 19.7.
static void win_mouse_click(wimp_pointer *pointer)
{
        wimp_icon_state         state;
        int                     option = 0;

        state.w = win_handle;
        state.i = WIN_ICON_INFO;
        wimp_get_icon_state(&state);

        switch (pointer->i) {
        case WIN_ICON_OPTION1:
                option = 1;
                break;
        case WIN_ICON_OPTION2:
                option = 2;
                break;
        case WIN_ICON_OPTION3:
                option = 3;
                break;
        }

        snprintf(state.icon.data.indirected_text.text, state.icon.data.indirected_text.size,
                        "Option %d is selected", option);
        state.icon.data.indirected_text.text[state.icon.data.indirected_text.size - 1] = '\0';

        wimp_set_icon_state(win_handle, WIN_ICON_INFO, 0, 0);
}
Listing 19.7: A revised Mouse Click event handler
We now use wimp_get_icon_state() to read the icon details, which includes the wimp_icon_data structure holding both the address and the size of the indirected buffer. We can then write to this, safely bounds-checking the text to suit the size set in our template editor.
The full code, along with the template file that we created in WinEd, can be found in Download 19.1.
When run, the application should look something like that in Figure 19.13.
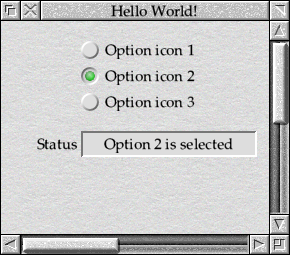
Figure 19.13: The application running from window templates
Whilst there’ minimal visible difference, the code for our application is now simpler, and more maintainable. It’s also a lot easier to design dialogue boxes in a template editor than by using code. We can now move on to tidying up some of the remaining loose ends with the radio icons, in order to make them fully Style Guide compliant.